
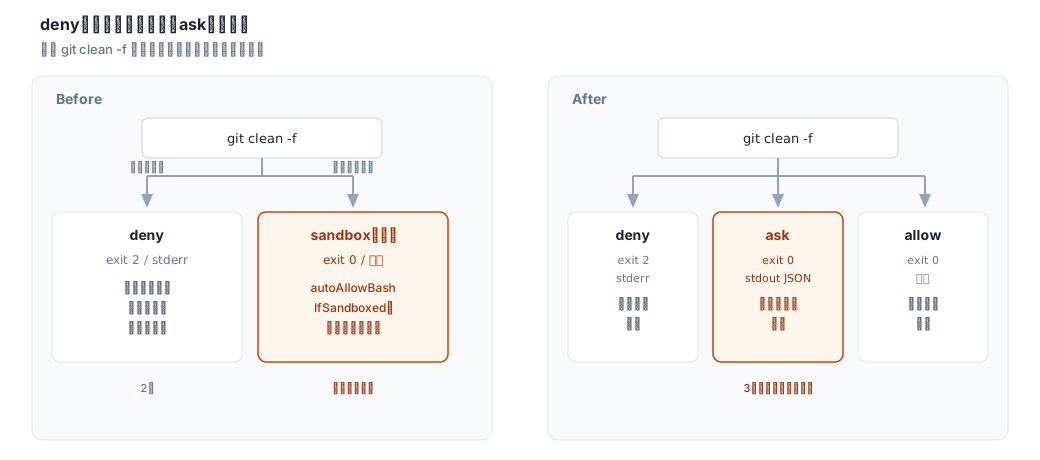
Claude CodeのBash実行ガードはdenyしか返せず、破壊的だが正当な理由で使うコマンドの置き場がありませんでした。Ruleにdecisionフィールドを足し、denyは従来どおりexit 2とstderr、askは新しくexit 0とstdoutのJSONで返すようにしています。
前回の記事で移したdenyは、静的ルールに触れたコマンドを問答無用で止める仕組みでした。
この記事では、denyに加えてaskを返せるようにした設計、そこで見つかったテストの穴、具体例として実装したmacOSキーチェーンの秘密読み出しブロックを書きます。実装は corrupt952/dotfiles の modules/claude/claude-bash-guard.py にあります。
denyだけではaskは表現できない
git clean -f は追跡外のファイルを一気に消し、取り消す手段がありません。それでいて、ビルド成果物の掃除など実行してよい場面もあります。ここを一律denyにすると、必要な場面まで塞いでしまい、やや不便です。
かといって何もしなければ、sandboxが有効な環境では sandbox.autoAllowBashIfSandboxed が働きます。sandboxされたコマンドを確認なしに実行する設定で、デフォルトで有効です。
permissions.json側にもaskパターンは書けますが、書けるのはコマンド文字列の前方一致だけです。「-fが付いていて、かつdry-runではない」という組み合わせ条件は表現できないので、Bash(git clean *)のように広く書いて安全な呼び出しまで確認を挟むか、書かずに諦めるかの2択になります。
結果として、確認だけしてほしいコマンドもdenyに落ちるような形になっていました。
Ruleにdecisionを足す
Ruleにdecisionフィールドを足しました。既定値は"deny"なので、既存のルールは定義を変えずに動きます。
@dataclass(frozen=True)
class Rule:
    id: str
    names: frozenset[str]
    message: str
    predicate: Callable[[Command], bool] = field(default=lambda _: True)
    decision: str = "deny"
git clean -f には、この型で新しいルールを足しました。
Rule(
    id="git-clean-force",
    names=frozenset({"git"}),
    decision="ask",
    predicate=lambda c: c.subcommand_is("clean")
    and (c.has_short_letter("f") or "force" in set(c.long_flags()))
    and not (c.has_short_letter("n") or "dry-run" in set(c.long_flags())),
    message=(
        "This deletes untracked files outright. Nothing in git can bring "
        "them back."
    ),
),
呼び出し側の分岐はこうなっています。
if rule.decision == "ask":
    # No echo: the prompt already shows the user the command.
    json.dump(
        {
            "hookSpecificOutput": {
                "hookEventName": "PreToolUse",
                "permissionDecision": "ask",
                "permissionDecisionReason": rule.message,
            }
        },
        sys.stdout,
    )
    return 0

print(
    f"{rule.message}\n\nBlocked sub-command: {abbreviate(command.raw)}",
    file=sys.stderr,
)
return 2
git clean -f を実行しようとすると、標準出力にはこう出ます。
{
  "hookSpecificOutput": {
    "hookEventName": "PreToolUse",
    "permissionDecision": "ask",
    "permissionDecisionReason": "This deletes untracked files outright. Nothing in git can bring them back."
  }
}
Hooks referenceのpermissionDecisionに"ask"を渡すと、ユーザーへの確認プロンプトが挟まります。コメントにある通り、コマンド自体はプロンプトにすでに表示されているので、返しているのは理由の一文だけです。
denyは前回の記事のまま変わっていません。exit 2でstderrに書いた文が、そのままブロック理由としてモデルに渡ります。
denyとaskで、メッセージの読み手を変える
Ruleのdocstringに、2つの判定の狙いを書いています。
"""A rule that stops a command, either outright or for confirmation.

`names` selects the programs it applies to; `predicate` narrows further.

The two decisions have different readers, so their messages differ in
kind. A `deny` message is read by the model: it says the block is a static
setting rather than a live refusal, and names what to do instead. An `ask`
message is read by the user in the approval prompt, which already shows the
command, so it says only what the command itself does not -- the
consequence -- in one sentence.
"""
denyのメッセージを読むのはモデルです。静的ルールによる遮断だと明示し、代替手段まで書くので数百文字になります。
askのメッセージを読むのはユーザーで、プロンプトにはコマンドそのものがすでに出ているので、書くのは実行結果の一文だけです。さきほどのgit-clean-forceのメッセージが一文で終わっていたのはこのためです。
denyの例を1つ並べると、長さの違いがそのまま出ます。
Rule(
    id="keychain-secret-read",
    names=frozenset({"security"}),
    predicate=lambda c: c.subcommand_is(
        "dump-keychain", "find-generic-password", "find-internet-password", "export"
    ),
    message=(
        "Reading secrets out of the macOS keychain is blocked by a static "
        "rule in settings.json. Nobody blocked this interactively. The "
        "secret would be printed straight into the transcript. Ask the "
        "user for it instead. Every other security subcommand still works."
    ),
),
4文使って、遮断の理由と代替手段まで書いています。次の節で、このルール自体の話をします。
macOSキーチェーンの秘密読み出しを止める
askの型ができたところで、denyのほうにも1件足しました。上のkeychain-secret-readです。
securityコマンドには、キーチェーンから秘密を読み出すサブコマンドが複数あります。dump-keychainはキーチェーン全体を、find-generic-passwordとfind-internet-passwordは個別の項目を、exportは証明書や鍵をまとめて書き出します。
承認したところで得るものがなく、秘密が必要ならユーザーに聞けばいい、という判断でdenyにしました。
一方でsecurityには、秘密を扱わないサブコマンドも多くあります。テストではこの境界をそのまま固定しています。
blocked("security dump-keychain", "keychain-secret-read")
blocked("security find-generic-password -s github -w", "keychain-secret-read")
blocked("security export -k login.keychain -t privKeys", "keychain-secret-read")
allowed("security list-keychains")
allowed("security default-keychain")
allowed("security find-identity -v -p codesigning")list-keychainsやfind-identityは、どのキーチェーンが登録されているか、どの証明書が使えるかを返すだけで、秘密そのものは出てきません。この4つのサブコマンドだけを狙い撃ちしているのは、境界がここにあるからです。
もう1件、sh -c 'security dump-keychain' のようにシェル1枚で包んだ形もテストしています。
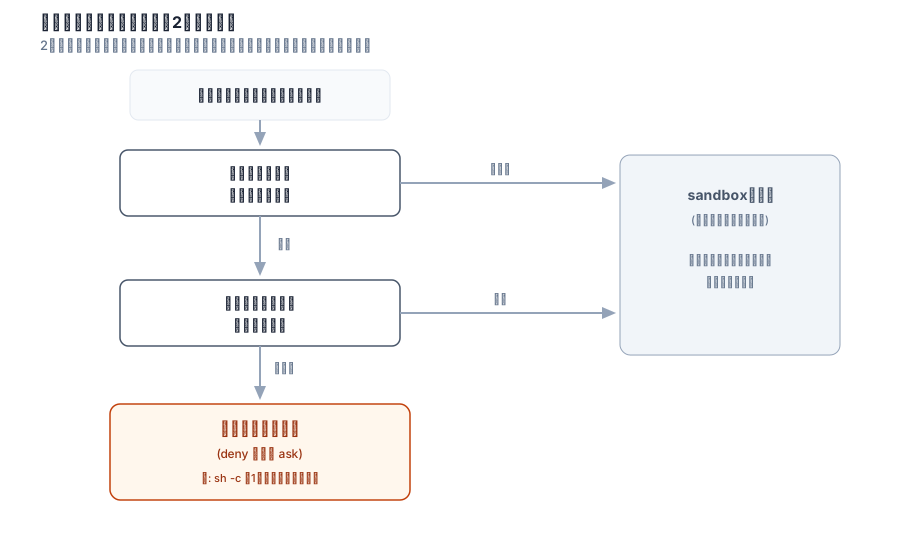
blocked("sh -c 'security dump-keychain'", "keychain-secret-read")find_violationは、shの-cに渡された中身を1段だけ展開して同じルールに掛け直します。2段目には踏み込みません。コードのコメントにはこうあります。
# One level, deliberately. Deeper nesting stops being the plain detour
# this hook exists to redirect, and containment is the sandbox's job.
ガードとsandboxの境界を2軸で引く
この1段しか展開しないという線引きは、キーチェーンのルールに限らずガード全体に通っている判断基準です。ファイル冒頭のdocstringにこう書いてあります。
"""PreToolUse guard for the Bash tool.

...

Fails open: a malformed payload lets the call through to the normal permission
flow. Real containment belongs to the sandbox settings.
"""
ここでいう封じ込め(containment)はsandboxの仕事で、このガードの仕事は誘導です。新しいルールを足すかどうかは、次の2つの軸で決めています。
モデルの素直な迂回を防げるか
security dump-keychainをsh -cで1枚包むくらいの書き換えは、指示に従っているつもりのモデルが普通にやります。ここは静的な条件判定で十分防げます。
難読化まで見抜く必要があるか
sh -cの中身をさらにsh -cで包み、それをbase64で包み、といった多段の難読化まで全部見抜こうとすると、対処するルールを書くたびに際限なく数が増えていきます。
ここまで追いかけるのは、静的ルールの役目を超えています。
find_violationが1段しか展開しないのは、1つ目の軸では「はい」で、2つ目の軸では「いいえ」に留めているからです。両方を満たすときだけ、ガードは新しいルールを引き受けます。どちらかがずれたら、sandboxの領分に戻します。
テストのallowed()がaskを見逃していた
askを実装しながらテストを見直していて、ヘルパー関数allowed()に穴があるのに気づきました。今のコードはこうなっています。
def allowed(command: str) -> None:
    # An ask also exits 0 with an empty stderr, so silence on stdout is what
    # separates "no rule matched" from "the user was asked".
    proc = run_full(payload_for(command))
    label = f"allowed: {command!r}"
    if proc.returncode == 0 and not proc.stderr and not proc.stdout:
        record(True, label)
    else:
        detail = (proc.stderr or proc.stdout).splitlines()
        record(
            False,
            label,
            f"expected silent exit 0, got {proc.returncode}: {detail[0] if detail else ''}",
)直す前はreturncode == 0とstderrが空であることの2条件しか見ていませんでした。askも同じ2条件を満たすので、あるコマンドが後からaskに変わっても、allowed()で書いたテストは気づかずに通り続けます。
コメントにある通り、stdoutの有無こそが「何のルールにも触れなかった」のか「ユーザーに確認を挟んだ」のかを分けています。
この時点でallowed()を使ったテストは100件超あり、どれも同じ穴を抱えていました。allowed()のパターンも順に精査していく予定で、そのタイミングでまとめて見直します。